Installation on MacOS
Basic Setup
Install brew
You can find the installation instructions here: https://brew.sh/
Use brew to install the following packages:
brew install \
cmake \
llvm@16 \
boost \
git \
python3 \
openssl@3 \
cryptopp \
curl \
ninja \
make
Install node via nvm
curl -o- https://raw.githubusercontent.com/nvm-sh/nvm/v0.39.5/install.sh | bash
# Or a different / newer version:
nvm install 20
nvm use 20
Using the template
-
Navigate to a directory of your choice and create a new repository based on the nui template, or clone the template source directly, available here: https://github.com/NuiCpp/nui-template This will provide you with a minimal baseline project to use nui with.
git clone https://github.com/NuiCpp/nui-template.git -
Navigate into the project clone:
cd nui-template(or what your fork is called) -
Create a build directory (I recommend a seperate debug and release dir):
mkdir -p build/clang_debugNavigate to that directory:cd build/clang_debug -
Configure using cmake:
LDFLAGS=\"-L/opt/homebrew/lib\" CPPFLAGS=\"-I/opt/homebrew/include\" cmake ../.. -G"Ninja" -DCMAKE_BUILD_TYPE=Debug -DCMAKE_C_COMPILER=/opt/homebrew/opt/llvm@16/bin/clang -DCMAKE_CXX_COMPILER=/opt/homebrew/opt/llvm@16/bin/clang++ -DNUI_NPM=npm -DNUI_NODE=nodeThis line has a lot more to it than it does on windows and linux. It specifies search paths for homebrew and uses clang from the homebrew llvm package. -
Build using
cmake --build . -
Your application is now in
build/clang_debug/bin/nui-template.exe
Visual Studio Code
-
Install an lldb debugging plugin: Install either "LLDB VSCode" or "CodeLLDB" plugin.
-
Download the template as outline above and open the directory with Visual Studio Code.
-
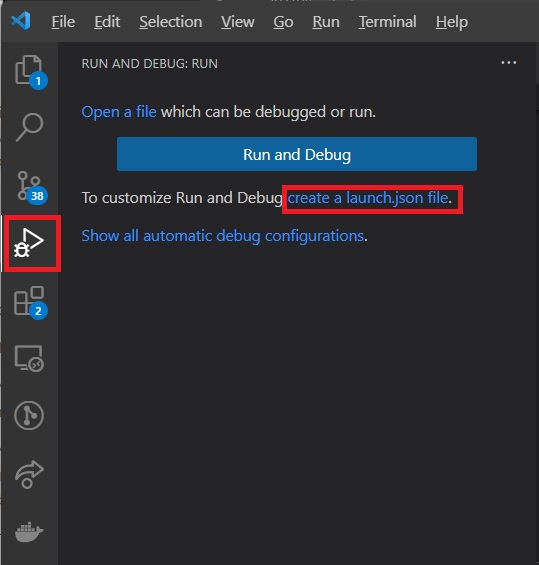
Create a launch.json configuration:

The configuration should look something like this:
{
    // Use IntelliSense to learn about possible attributes.
    // Hover to view descriptions of existing attributes.
    // For more information, visit: https://go.microsoft.com/fwlink/?linkid=830387
    "version": "0.2.0",
    "configurations": [
        {
            // or lldb if you installed the 'CodeLLDB' plugin
            "type": "lldb-vscode",
            "request": "launch",
            "name": "Launch Program",
            "program": "${workspaceFolder}/build/clang_debug/bin/nui-template",
            "cwd": "${workspaceFolder}",
            "preLaunchTask": "build_debug"
        }
    ]
}
The launch configuration already defines a preLaunchTask, which does not yet exist.
- Create a tasks.json
Create a tasks.json in the .vscode directory of your project. This file will be next to the launch.json.
Fill the tasks.json with the following content:
{
    "version": "2.0.0",
    "options": {
        "cwd": "${workspaceFolder}",
        "env": {
            "LDFLAGS": "-L/opt/homebrew/lib",
            "CPPFLAGS": "-I/opt/homebrew/include",
            // Modify this line to point to your nvm installation with the appropriate node version
            "PATH": "/Users/USERNAME/.nvm/versions/node/v20.8.0/bin:${env:PATH}"
        }
    },
    "tasks": [
        {
            "label": "configure_debug",
            "command": "cmake",
            "args": [
                "-D",
                "CMAKE_BUILD_TYPE=Debug",
                "-D",
                "CMAKE_COLOR_DIAGNOSTICS=ON",
                "-D",
                "CMAKE_C_COMPILER=/opt/homebrew/opt/llvm@16/bin/clang",
                "-D",
                "CMAKE_CXX_COMPILER=/opt/homebrew/opt/llvm@16/bin/clang++",
                "-D",
                "NUI_NPM=npm",
                "-D",
                "NUI_NODE=node",
                "-G",
                "Ninja",
                "-B",
                "build/clang_debug",
                "-S",
                "."
            ],
            "type": "shell",
        },
        {
            "label": "build_debug",
            "command": "cmake",
            "dependsOn": "configure_debug",
            "type": "shell",
            "args": [
                "--build",
                "build/clang_debug"
            ],
            "presentation": {
                "reveal": "always"
            },
            "group": "build"
        }
    ]
}