Installation on Windows
On Windows you have several options to work with Nui:
- Visual Studio users can use Visual Studio with CMake and Clang.
- msys2 can be used together with the IDE of your choice, like
Using Visual Studio 2022
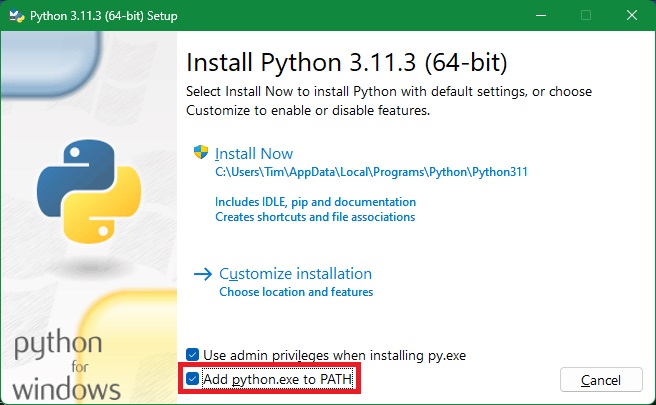
Install python3
Download and Install python3: https://www.python.org/downloads/ Make sure that the python executeable is in PATH
Install nodejs and npm
Using nvm is the most practical way to install node and npm https://github.com/coreybutler/nvm-windows/releases.
If you already have node installed, uninstall it first before using nvm.
- Open cmd (WinKey + R and type cmd in the menu) and install the latest or LTS version with
nvm install latest - Activate the version using
nvm use VERSION_HEREfor examplenvm use latest.
Install Visual Studio Packages
Make sure that you have installed the following components for Visual Studio 2022 using the official Visual Studio Installer:
- vcpkg package manager
- C++ CMake tools for Windows
- C++ Clang tools for Windows (<- not automatically included in the Desktop development with C++ Workload setting)
- git for Windows, or install it via official downloads: https://gitforwindows.org/
Nui only supports clang and requires clang for WASM compilation. MSVC and gcc are not supported.
Using the Template
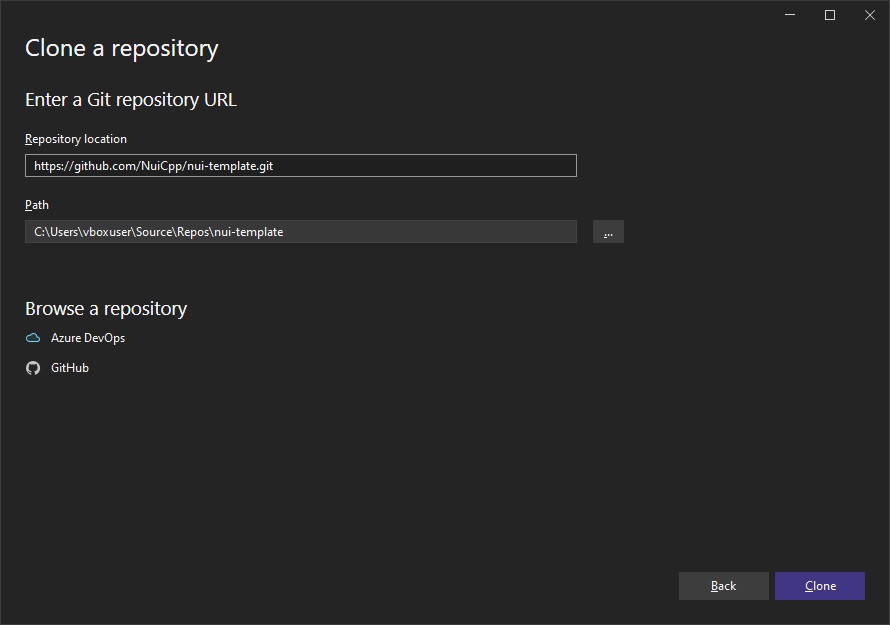
- Create a new repository based on the nui template, or clone the template source directly, available here: https://github.com/NuiCpp/nui-template. This will provide you with a minimal baseline project to use nui with. Open the manually cloned directory in Visual Studio or clone using Visual Studio.
- Setup vcpkg
Open a terminal from within Visual Studio:
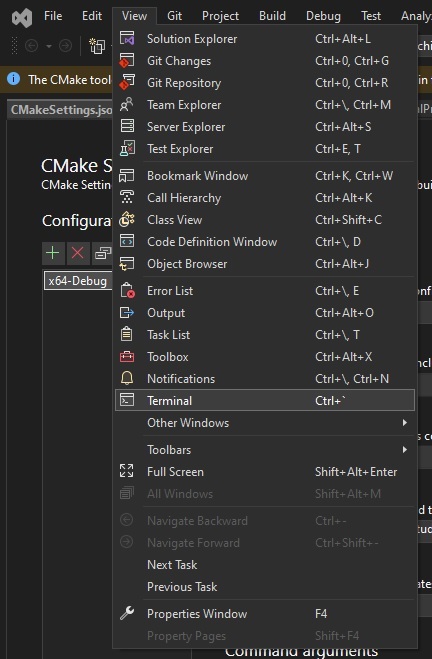
Enter vcpkg integrate install

- Copy the displayed path to the toolchain file and enter the CMake settings view via Project->"CMake Settings for ..."
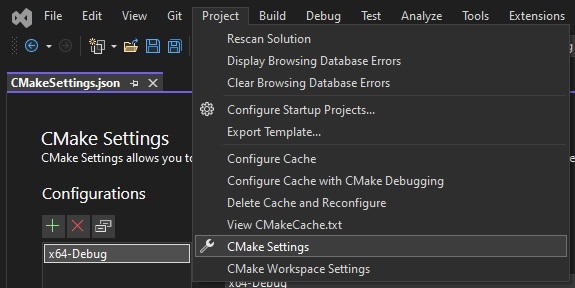
- Set the copied toolchain file path
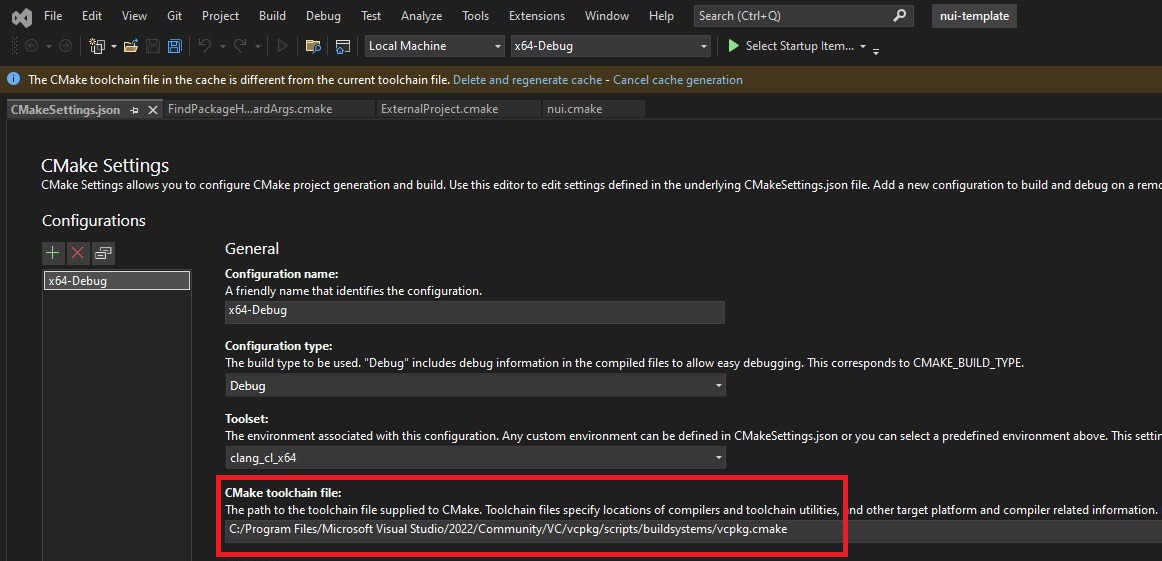
- Also Switch to the clang_cl toolset and save. If the toolset is missing, install it using the Visual Studio Installer.

- Delete the cache and reconfigure
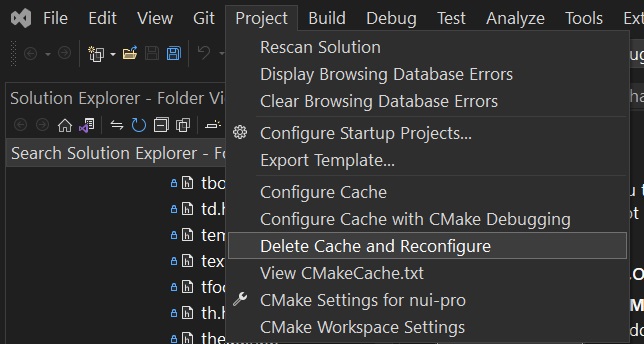
It can take some time for the dependencies to install.
Using msys2
This tutorial shows you how to build using the msys2 tools.
Install msys2 if you dont have it installed
Follow the installation instructions here: https://www.msys2.org/
Make sure to update after the initial installation using pacman -Syu.
After installation navigate to your msys2 installation and open the clang64 environment terminal.
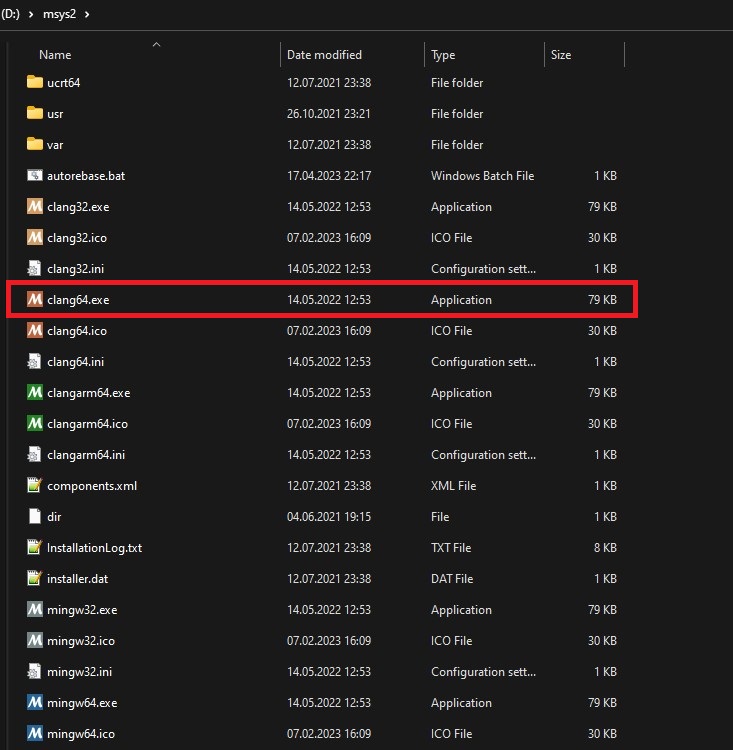
This terminal should open:
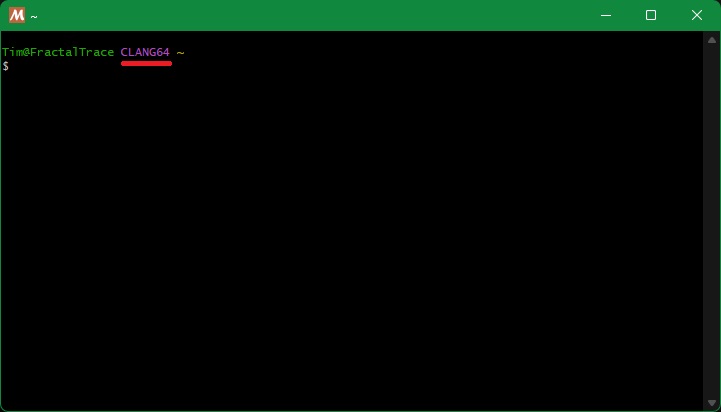
Install the follwing packages with pacman:
pacman -S \
	unzip \
	mingw-w64-clang-x86_64-cmake \
	mingw-w64-clang-x86_64-ninja \
	mingw-w64-clang-x86_64-clang \
	mingw-w64-clang-x86_64-boost \
	mingw-w64-clang-x86_64-curl \
	mingw-w64-clang-x86_64-crypto++ \
	mingw-w64-clang-x86_64-openssl \
	mingw-w64-clang-x86_64-python \
    mingw-w64-clang-x86_64-binaryen \
	mingw-w64-clang-x86_64-gdb
Install nodejs and npm
- Paste one of the curl/wget commands into your msys2 clang64 terminal: https://github.com/nvm-sh/nvm#installing-and-updating This will install nvm for msys2.
- Now restart your terminal.
- List versions using
nvm ls-remote - Pick a version, either newest or the Latest LTS.
- Install that version using
nvm install VERSION_HEREfor examplenvm install 20.2.0 - Activate the version using
nvm use VERSION_HEREfor examplenvm use 20.2.0
The activated versions persits through all terminal instances.
Setup your project
Install git in the msys2 terminal using pacman -S git
Building your first project
(You can skip this part and go straight to Visual Studio Code if you use this IDE)
- Navigate to a directory of your choice within the msys2 clang64 environment terminal using
cd PATH_HERE, the default path the msys2 terminal is in, is the msys2 home directory located in your msys2 installation.
msys2 paths to your drives are written like /C/msys64 instead of C:/msys64.
-
Create a new repository based on the nui template, or clone the template source directly, available here: https://github.com/NuiCpp/nui-template This will provide you with a minimal baseline project to use nui with.
git clone https://github.com/NuiCpp/nui-template.git -
Navigate into the project clone:
cd nui-template(or what your fork is called) -
Create a build directory (I recommend a seperate debug and release dir):
mkdir -p build/clang_debugNavigate to that directory:cd build/clang_debug -
Configure using cmake:
cmake ../.. -G"Ninja" -DCMAKE_BUILD_TYPE=DebugYou can also use the-G"MSYS Makefiles"generator, but this is strongly discouraged, because emscripten can not be parallelized using make on windows making builds several magnitudes slower.
Make sure you have installed mingw-w64-clang-x86_64-ninja not simply ninja and are operating from a
msys2 clang64 environment terminal.
-
Build using
cmake --build . -
Your application is now in
build/clang_debug/bin/nui-template.exe
Using msys2 with the Windows Terminal
If you want the slightly prettier Windows Terminal with msys2, there is a tutorial here: https://www.msys2.org/docs/terminals/
Using Visual Studio Code
First setup msys2 as explained above
Setup msys2 Terminal in Visual Studio Code
First add these lines to your settings.json to integrate the msys2 terminal into
visual studio.
To access the user settings.json press Ctrl+Shift+P and enter settings.json and chose the User settings option:

{
    "terminal.integrated.profiles.windows": {
        "MSYS2 CLANG64": {
            "path": "cmd.exe",
            "args": [
                "/c",
                // Change the path here to your installation!
                "C:\\msys64\\msys2_shell.cmd -defterm -here -no-start -clang64"
            ]
        }
    },
    // If you want it as your default terminal:
    // "terminal.integrated.defaultProfile.windows": "MSYS2 CLANG64"
}
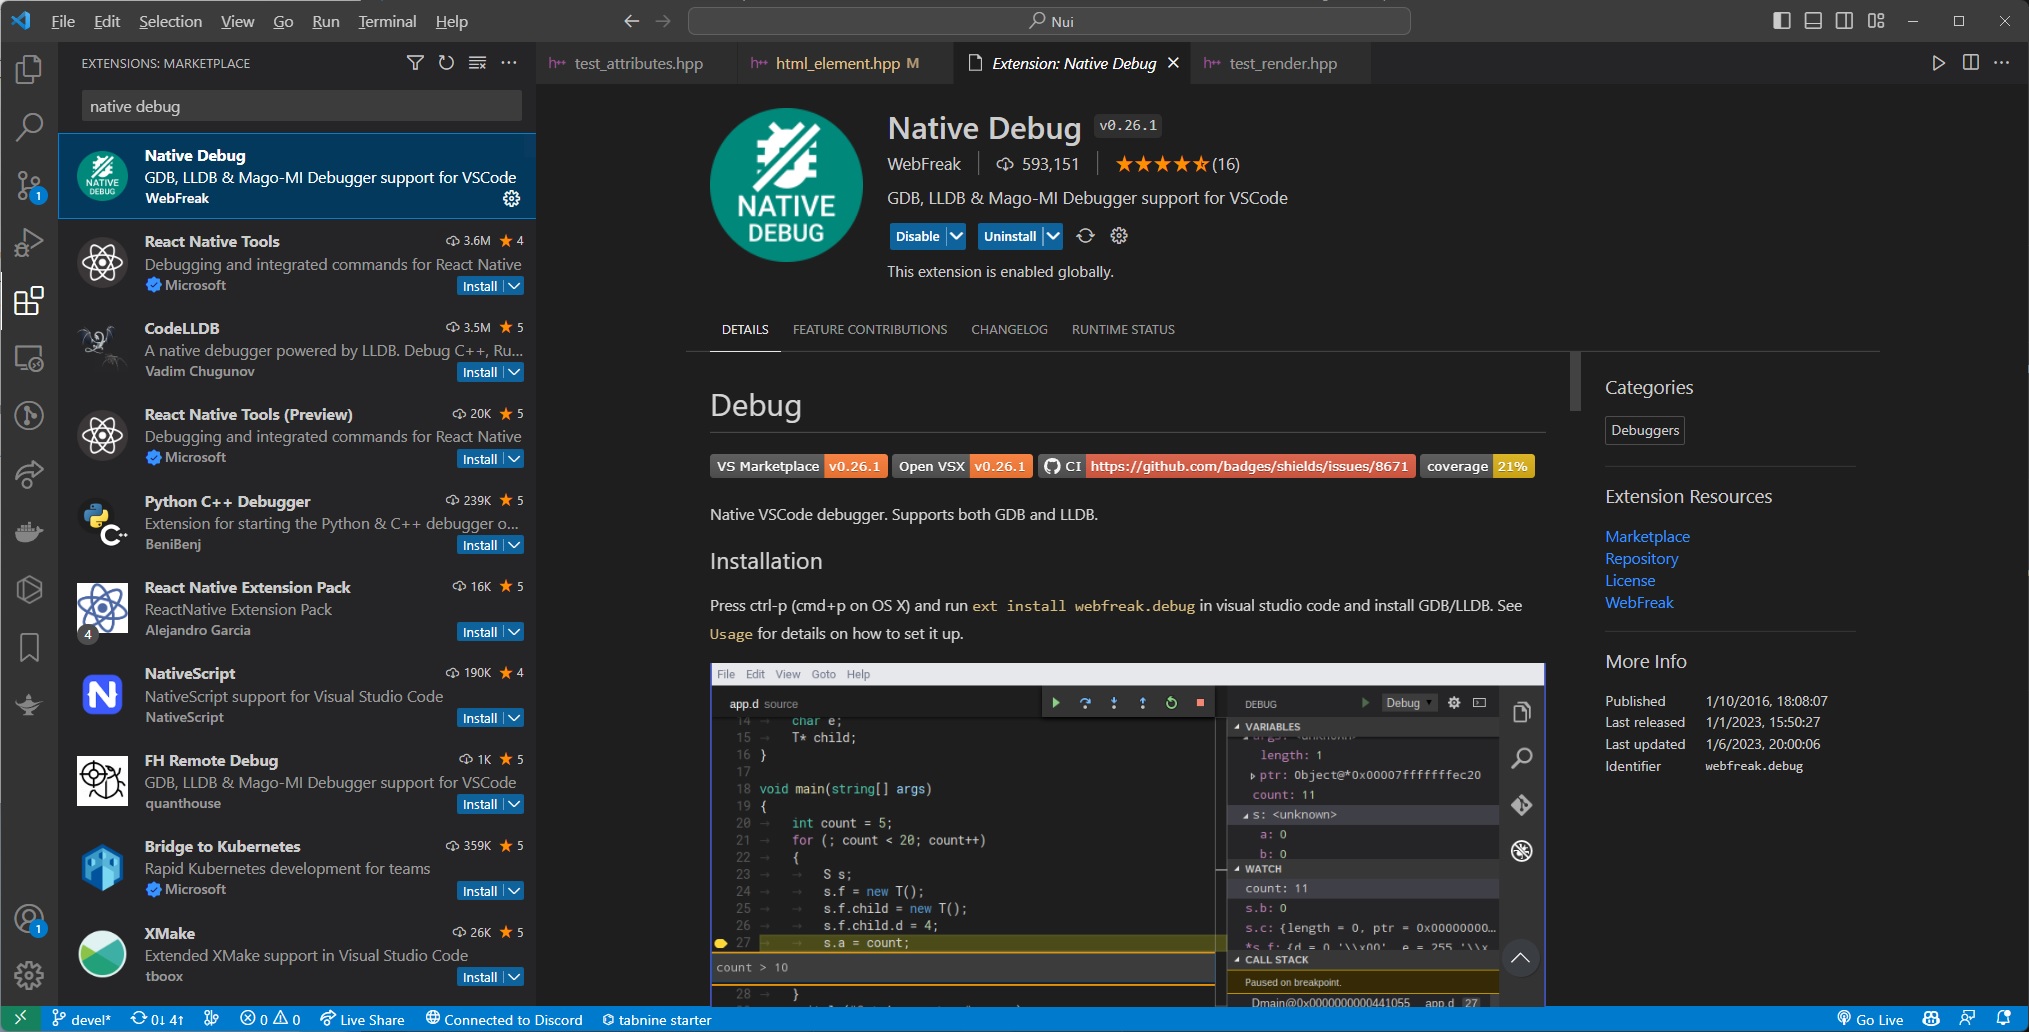
Install Native Debug Plugin
The shipped cppdbg has not worked well with msys2 as of the time of this writing.
This is why installing the Native Debug plugin is recommended:
Setting Up Your First Project
Open a msys2 Terminal from within Visual Studio Code.
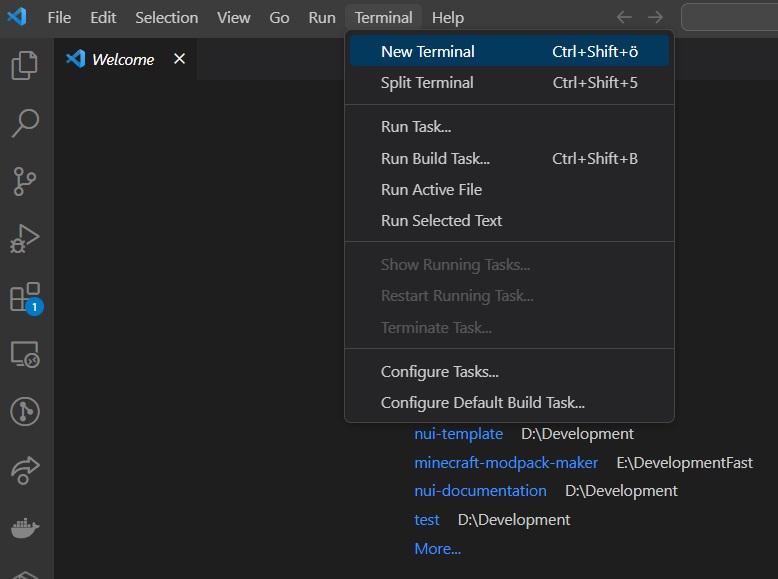
A terminal now opens at the bottom of vscode
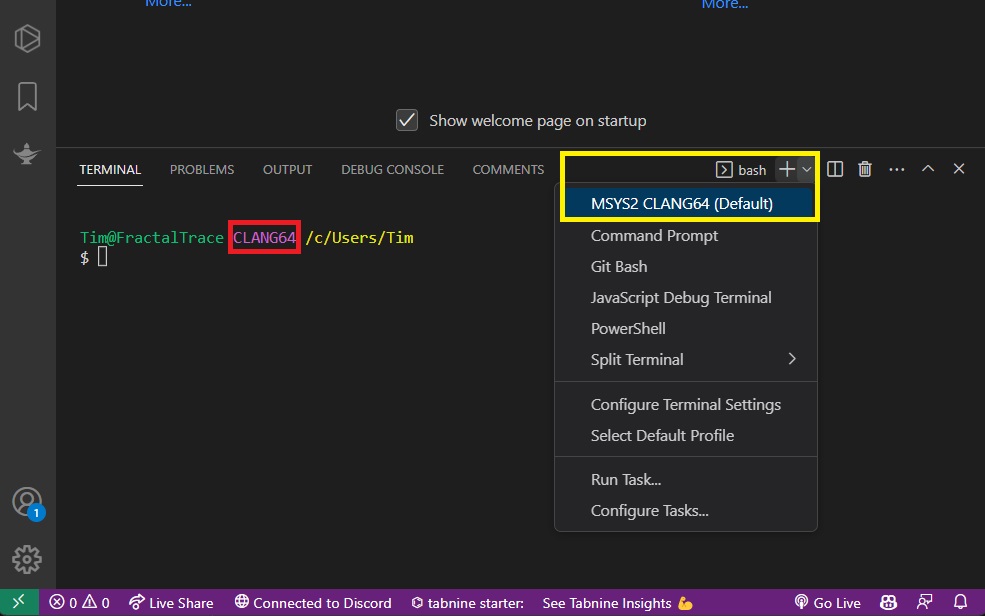
If you didnt set up the msys2 terminal as the default in the previous step, you have to open an msys2 clang64 terminal. You will see the CLANG64 text as outlined in the above image by the red box.
You can navigate to a directory of your chosing and clone your fork of the nui-template or clone the nui-template directly if you dont want to setup a git project: git clone https://github.com/NuiCpp/nui-template.git
Open the checked out project/directory in Visual Studio Code.
Creating Your Run Configuration
Now that you have opened your project, create a launch configuration in Visual Studio Code. Go onto the run and debug tab and click on the "create a launch.json file" link.
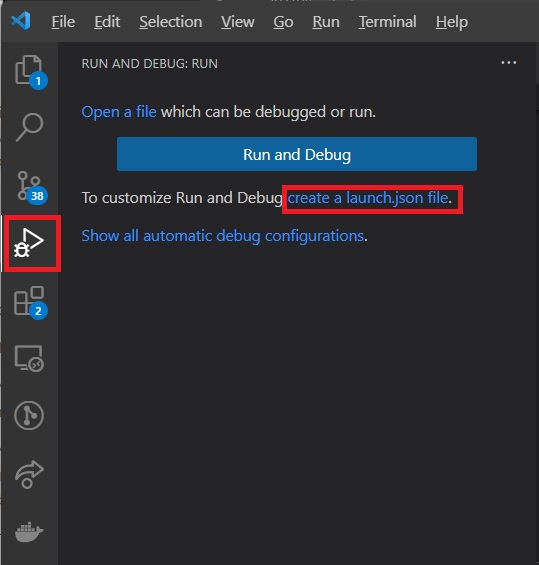
A window will open at the top with several options. Pick the GDB option provided by the Native Debug plugin.
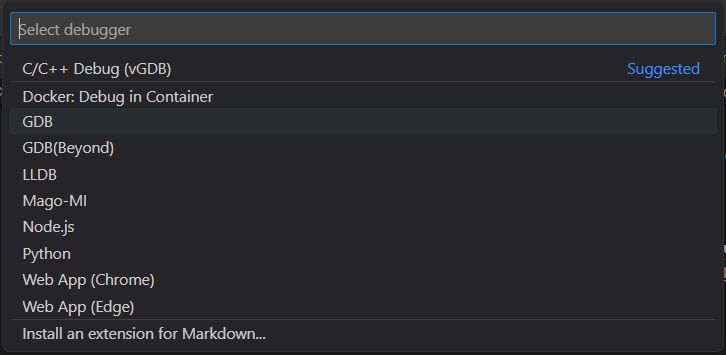
The launch.json will now open with a preset. Change/Adapt the contents to the following:
{
    // Use IntelliSense to learn about possible attributes.
    // Hover to view descriptions of existing attributes.
    // For more information, visit: https://go.microsoft.com/fwlink/?linkid=830387
    "version": "0.2.0",
    "configurations": [
        {
            "name": "Debug",
            "type": "gdb",
            "request": "launch",
            // If you change the name of your project/application, you need to change the executeable name here too:
            "target": "${workspaceRoot}/build/clang_debug/bin/nui-template.exe",
            "cwd": "${workspaceRoot}",
            // Adapt the path to your point to your msys2 installation.
            // Use the gdb from the clang64 environment installed by mingw-w64-clang-x86_64-gdb
            // NOT the globally available package gdb, because that one is far older.
            "gdbpath": "C:/msys64/clang64/bin/gdb.exe",
            "valuesFormatting": "parseText",
            "preLaunchTask": "build_debug"
        }
    ]
}
The launch configuration already defines a preLaunchTask, which does not yet exist.
Create a tasks.json in the .vscode directory of your project. This file will be next to the launch.json.
Fill the tasks.json with the following content, which will allow you to build within msys2's environment.
Dont forget to change the bash executeable path to point to your msys2 installation.
{
    "version": "2.0.0",
    "options": {
        "cwd": "${workspaceFolder}",
        "env": {
            "MSYSTEM": "CLANG64",
            "CHERE_INVOKING": "1"
        },
        "shell": {
            // Modify this path to match your msys2 installation
            "executable": "C:\\msys64\\usr\\bin\\bash.exe",
            "args": [
                "--login", "-i", "-c"
            ]
        }
    },
    "tasks": [
        {
            "label": "configure_debug",
            "command": "cmake",
            "args": [
                "-D",
                "CMAKE_BUILD_TYPE=Debug",
                "-D",
                "CMAKE_COLOR_DIAGNOSTICS=ON",
                "-G",
                "\"Ninja\"",
                "-B",
                "build/clang_debug",
                "-S",
                "."
            ],
            "type": "shell",
        },
        {
            "label": "build_debug",
            "command": "cmake",
            "dependsOn": "configure_debug",
            "type": "shell",
            "args": [
                "--build",
                "build/clang_debug"
            ],
            "presentation": {
                "reveal": "always"
            },
            "group": "build"
        }
    ]
}
You can now build and run your application using the green arrow in the build and run tab or by pressing F5.
Using CLion
Clion is very flexible and allows for both the Visual Stuido toolset to be used with vcpkg,
Or the msys2 environment. This tutorial will show how to use it with msys2.
The Visual Studio way is similar, but requires you to set the vcpkg toolchain file via -DCMAKE_TOOLCHAIN_FILE=... just like the Visual Studio tutorial shows.
With the msys2 Environment
The official information by jetlion is outdated for clang with msys2, because of the clang64 subsystem. This tutorial shows how to setup clang properly.
Follow the msys2 instructions up to the point where you would be building the template project. Within CLion:
- Open the cloned project nui-template. If you never set up a toolchain, the following windows might pop up automatically.
- Go to File -> Settings -> Build, Execution, Deployment -> Toolchains
- Create a new Toolchain for MinGW
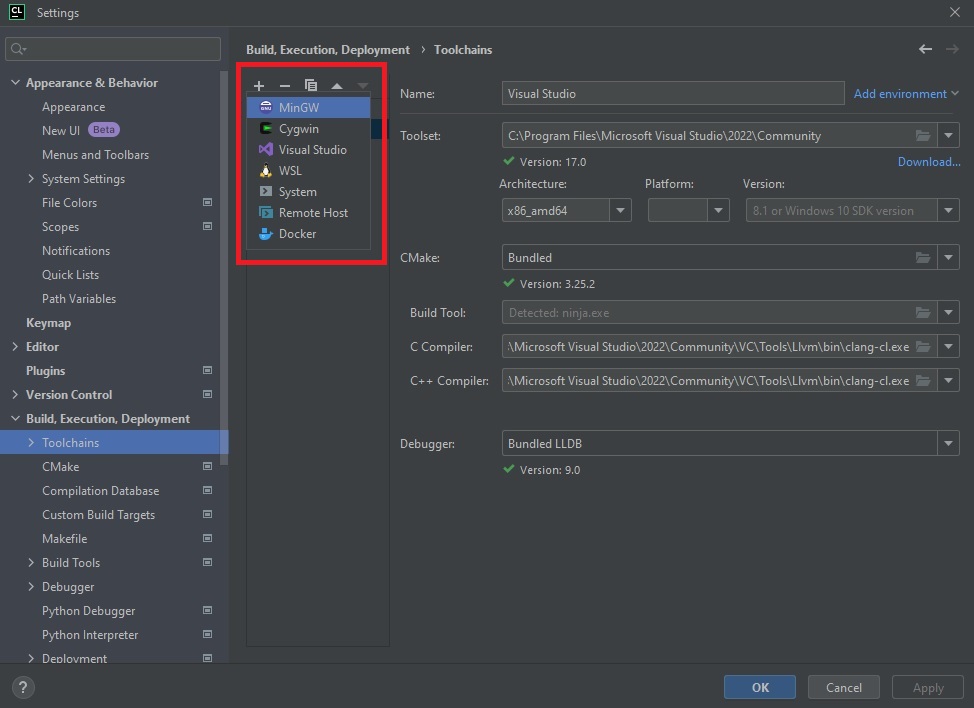
- Fill out the form like this. Make sure that you chose the path to your msys2 installation as it may vary.
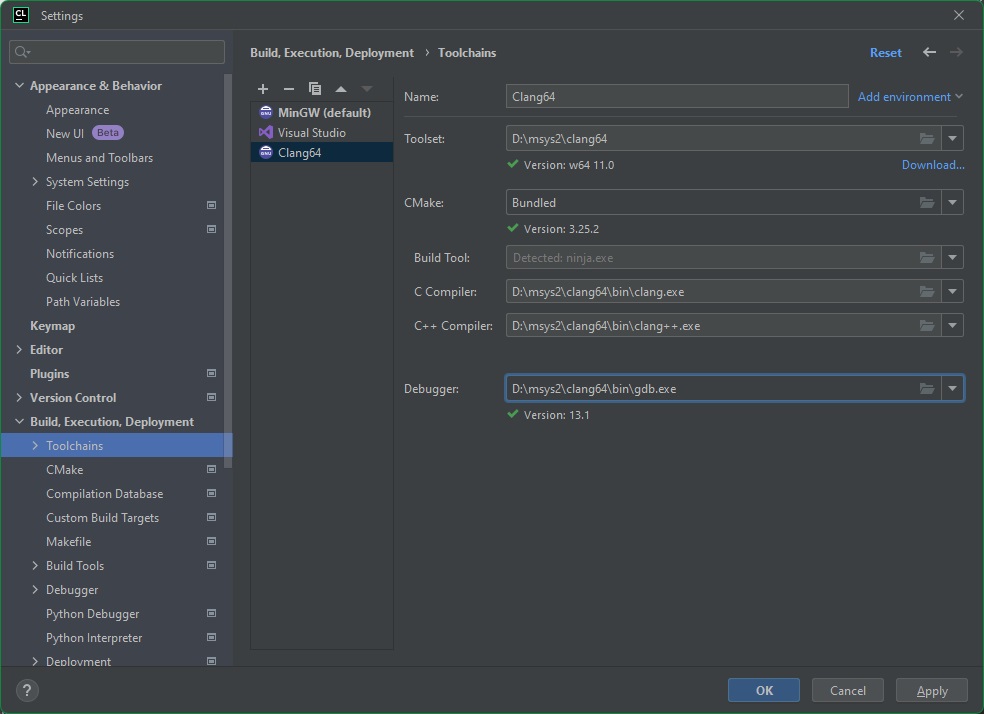
- Now add a CMake profile like this:
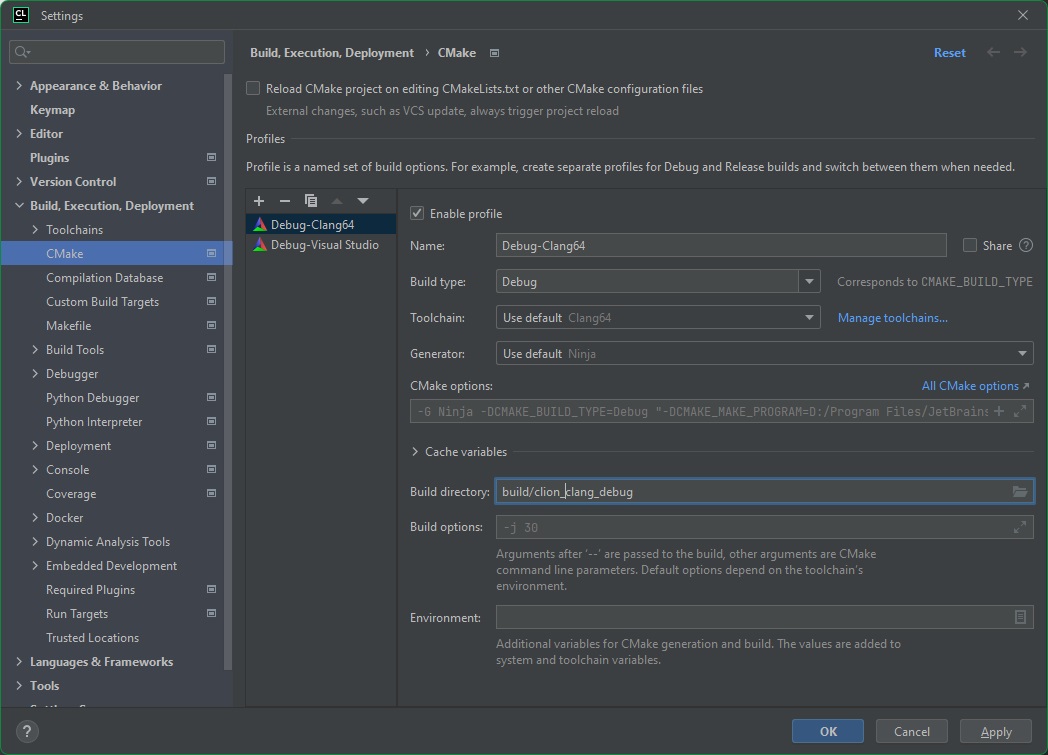
- You can now add a CMake run configuation

- Which will automatically find all targets and make them runable
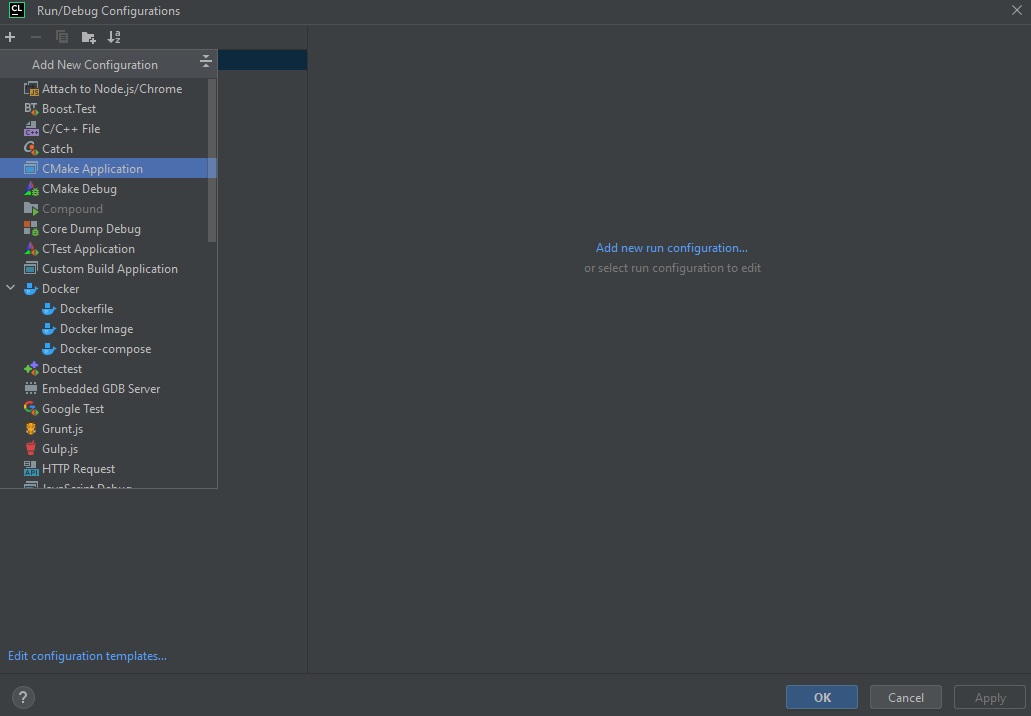
- Run the nui-template target and its going to be built and executed.
Troubleshooting
Error: could not find git for clone of nui in FetchContent
CMake cannot find git in your PATH environment. For Visual Studio install git either using the Visual Studio Installer, or manually via the offical website. In the msys2 case, install git via the commandline.
Could not find boost / curl / etc
If you are using Visual Studio, you did not setup vcpkg correctly. Retrace the steps outlined above (Install vcpkg), alternatively install vcpkg manually: https://vcpkg.io/en/getting-started.html
If you are using msys2, install the correct packages for the clang64 subsystem.
Other
- When using Visual Studio, make sure that there is no other clang in the PATH. Visual Studio uses the first clang it finds it your PATH environment variable which can cause weird behaviour.